
Getting started with YafaRay for external architectural rendering
In a previous article I showed up a quick and simple way to setup YafaRay for interior design, using techniques and tools to better create a still image to show interiors. Now it’s time to take a look on how to setup a model for an external view, simulating the sunlight from a clear sky. Just like in the previous tutorial, I will use for this example a simple model I always use as a modeling exercise for my architectural visualization class. The model has only the main shapes of an architectural project and will be perfect for our example. If you like to keep track of the units, this model is scaled with the proportions of 1 Blender Unit for each 1 meter.
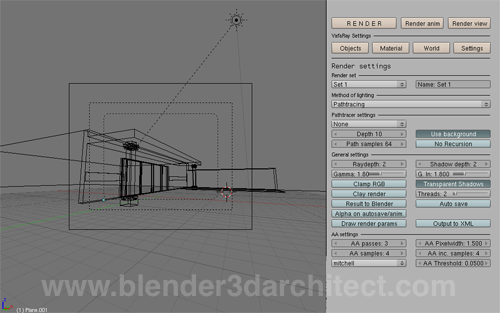
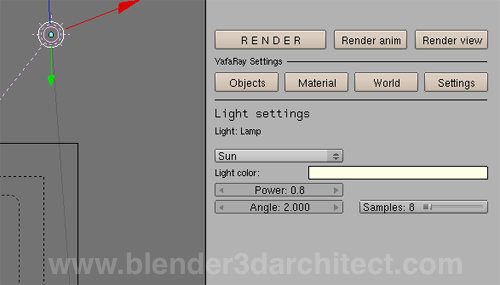
The first thing to do in the scene is to position a sun lamp point towards the way we want our shadows to be casted in the scene. When the sun lamp is placed, select the lamp and click at the Objects button at the YafaRay exporter interface. Set the Sun Lamp as a sun and increase a bit the angle to create soften shadows.
With the sun configured, we can go to the World button. This is a quite important area to work, because we will use it as a background for the scene, which will have an influence at the illumination as well. Set it as a gradient and choose bright colors for the first three fields and a darker one to the last, like the ones showed in the image below.
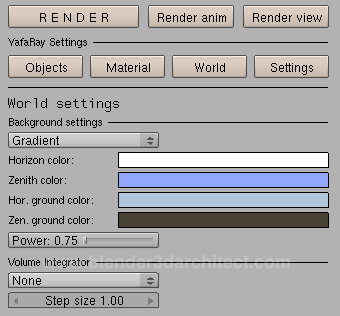
By my experience, setting the world with a high Power will produce burned out renders. If you don’t want that, set the Power of the background to 0.5 or less.
And finally we can go to the Settings tab, where we will setup the render. For external views, the best option is to use Path Tracing, which gives the best and fastest results. We could use any render method, but with Path tracing the image will have a good quality and a short render time.
We have to tweak only a few settings to get a good external render. Below I list only the settings that demand changes:
Pathtracer settings
- Depth:10
- Path Samples: 64
- Use Background: On
General settings
- Raydepth: 2
- Shadow depth: 2
- Transparent Shadows: On
AA settings
- AA Passes: 3
- AA Samples: 4
- AA inc. samples: 4
- Filter type: Mitchell
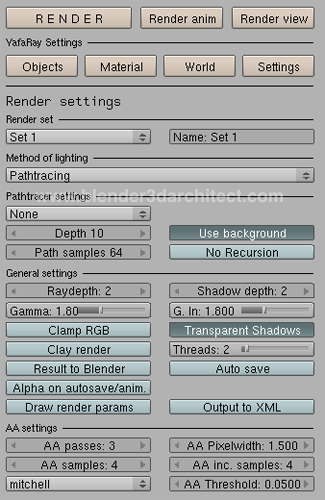
If you use transparent windows at the project, it’s quite important to turn on the Transparent Shadows button. And at the end all we have to do is hit the Render button and see the image rendered:
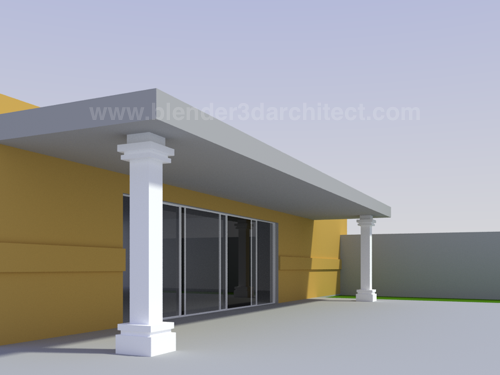
Don`t take that as a rule, it`s just a starting point for you to render external scenes with both Blender 3D and YafaRay. If you render doesn`t look good, change the settings of the Path samples to remove the noise and increase the Ray depth if the transparent objects look too dark.
The next step is to work with advanced settings and scenes, but that’s a subject for another article!


Thanks for the tuto Allan.
I´m curious about why you decided to use gradient background instead of SunSky.
Greetings!
Thank you for doing some Yafaray tutorials for the exterior! This is a great starting point to begin using it for exterior renders. I look forward to the advanced settings and scenes.
Thanks for posting your tutorials! I really enjoy
reading your site.
Thank you! This is help just in time, as i’m doing an exterior scene right now! I’m experimenting with night time exterior lightning too, a tutorial on that would be also really helpful!
Hi Arkinauta,
The reason to use a gradient background is simple to speed up the setup of the scene. A gradient background requires just a few adjustments.
I believe that for beginners it`s quite easier to start with a simple background.
Regards
Don’t you think it’s even easier for beginners to use the Sun-sky presets? I’m not sure that feature was there in Yafaray at the time you wrote this article.
Thank you for this turtorial.