How to correct the topology of a 3d model for architectural visualization?
One of the most interesting things about 3d modeling is that, there isn't a right or defined rule to create a model or organize the topology, sometimes the same object can be created with several different solutions. I see that all the time when I teach a class about 3d modeling, with the students finding their own way to create the topology of a model. But, in some cases bad decisions on the modeling process can result in a sort of trap, when you have to edit or change the topology of parts of the model, you can fall into this trap!
And for that we have another type of knowledge that can help a lot of 3d artists, which is the ability to correct bad topology. This type of knowledge can really help, especially when we have to be part of a team, where an less experienced artist end up by setting up the topology of a 3d model in the wrong way. Since in Blender 3D we can't use N-GONS yet, it's a bit harder to find messy topology like the one I will be showing in this article.
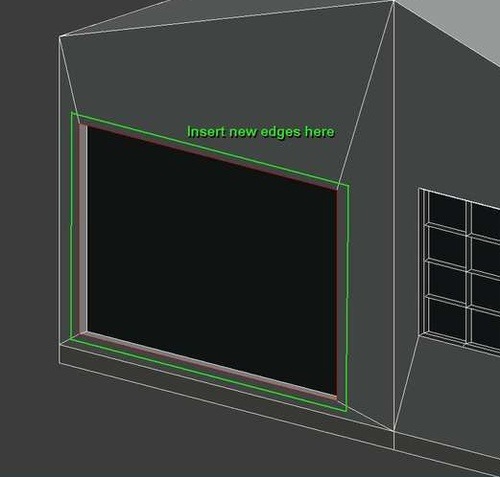
This week I was browsing some web sites and forums about 3d modeling and found an interesting post from an artist, with some difficulties to edit a model because of the topology. You can find the message in the CG Society forums, and his problem involves the creating of an edge loop around a door. But, the faces and edges of the model are all non-orthogonal and the faces look like an irregular polygon. Here is how it looks:

And now here comes the question that I will bring to my students and for you as well: How would you solve this problem? How can we add an edge loop around those objects? The real problem is to create those edges, and keep all of them with the same distance between the new and original loop.
If we use the Face Loop Cut it will generate the loop, but the edges will be each one in a different distance from the original loop.
It will be quite interesting to see how other artists solve this problem, and I will bring this situation to my next 3d modeling class as an exercise. Some people don't like to deal with problems like this, and prefer to erase the faces and start from scratch a new set of faces. But, this is not an elegant solution and for a complete model, it can compromise other parts like UV Mapping.
So, how would you add an edge loop around that door/window?


i have always just selected the edge loop tool and before clicking to select where to place it, make it as small;hence right on top of the existing square. Once edge loop has been made it is automatically selected. Then just scale bigger to perfection…
theKiwi’s technique is good.
With the pivot mode set as bounding box center (hit the comma key)and the edges you want outset selected
type ctrl-r to initiate a loop cut,
then lmb drag right back onto the outline you want to get the outset from and hit enter
then hit the s key to scale the new edge loop
How i would do it:
select the edge loop of the window, bevel it without inset – that creates a new wanted edge loop exact at some position.
Than scale it up with the needed restrictions (“in plane”).
Done.