
For modeling related tasks you will find that Blender is capable of handling the most complex types of creations. It could be a full building or furniture model; you will find a tool that will help you with the modeling.
You can get models in Blender exported as either OBJ and FBX to use in all other types of software, like real-time engines like the Unreal Engine.
What about BIM tools? Is it possible to export models from Blender to use in Revit, ArchiCAD, VectorWorks, or any other BIM enabled software?
Yes, there is a way to get 3d data from Blender and transform that into BIM files. But, for that, we will need a middleware. Because there is no available way to get 3d data out of Blender in a format compatible with BIM.
BIM files
Before we go to the actual conversion, we have to choose a file format to use. For instance, if you plan to get Families for Revit, you would create an RFA file.
But, most file formats from proprietary softwares like Revit are impossible hard to create without a licensing their tools.
Luckily for us, there is an open standard format for BIM files called IFC. The Industry Foundation Classes is an open standard format that is compatible with practically all BIM tools.
You can import and export IFC files from tools like Revit. It is a great way to save projects in a cross-platform format to exchange data. Almost like DXF stands for CAD software.
What makes BIM files unique?
Can we just directly convert a blend or OBJ file to IFC? That would be incredibly useful, but it is not possible due to the nature of BIM technology.
When we compare OBJ and IFC files, you will realize that OBJ is a dumb format. Because it is nothing more than a collection of faces, edges, and vertices. Nothing more.
An IFC file has a lot more stored. For instance, you will be able to add meaning to parts of an object. For example, a wall won't be a collection of faces anymore. The software knows that it is a wall and has a width, height, volume, materials, and more.
You can extract data from it to generate construction details and technical drawings.
Why would you want to create BIM files from Blender models?
You can get models that you have in Blender and integrate them into an extensive workflow, using the data for not only create marketing materials but to create construction data.
Another reason significant reason, is to generate more income sources from your work. You can create libraries of furniture models and sell them to professionals and companies using BIM tools.
BIM files from Blender
Now, how can we export BIM files from Blender? In the following article, I will export a model from Blender and convert it straight to IFC. To get it done, you will need two additional tools.
Here is a list of all resources you will need to export BIM files from Blender:
- Blender (Obviously)
- FreeCAD
- IfcOpenShell
The workflow to convert Blender models to IFC is to open them in FreeCAD and use the IfcOpenShell to create IFC models. FreeCAD will be our middleware.
It seems complicated, but once you setup everything it will be quite fast to convert models. For this particular example, I won't add properties to the model. Just a straight conversion.
If you don't have FreeCAD installed, download the software and install it. By the way, it is also free and opensource.
In Blender, you can export the model as an OBJ file. That is the easy part.
Once you open FreeCAD, you can change the workbench to Arch. What is a workbench? In FreeCAD you will find workbenches, which is something similar to what we have in Blender with the object interaction mode. Like Object Mode and Edit Mode.
The Arch workbench will load lots of architectural tools to create walls, structures, roofs, and more.
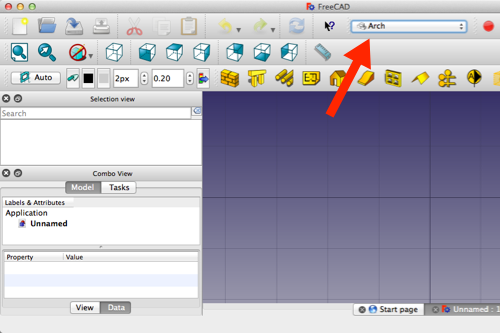
To get a 3d model from Blender to FreeCAD you can go to the File menu and use the import option. Choose OBJ, and you will get the Blender model in FreeCAD,
Now, if you go to the File menu in FreeCAD, and choose the Export option. You will see IFC in the file format selector.
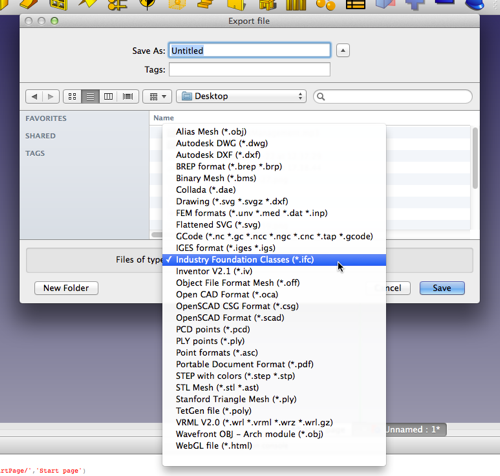
Any attempt to export an IFC file at this point will most likely show an error. The reason for that is because you don't have ifcopenshell installed. The option is there, but FreeCAD needs that library to create IFC files.
How to make sure?
You can open the Python Console in FreeCAD going to the View menu and choose Panels->Python Console.
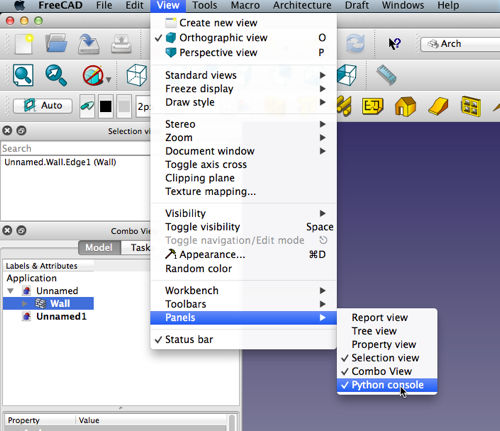
At the Python console type:
import ifcopenshell
You will most likely see an error.

How to fix that? You have to download the library and extract the files. Go to the IfcOpenShell page that has the Python library. Choose the proper file for your operating system and Python version. At the top of your Python Console, you will see the version you need.
In my case, I will use a version for MacOS and Python 2.7. Download and extract the ZIP file.
Now, comes the tricky part. Where to place the extracted module?
You can use the Python Console in FreeCAD to find out. At the console you can type the following commands:
import sys
for i in sys.path:
print i
That will display all folders that FreeCAD can read. If you place the ifcopenshell library at any of those folders, FreeCAD will be able to read it.
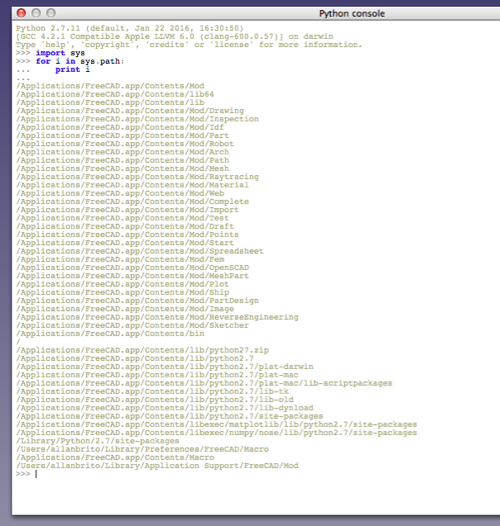
In my case, I will use the “/Library/Python/2.7/site-packages/“ folder.
Once you copy the files there, you are all set. Just to make a quick test, you can type again in the console:
import ifcopenshell
If nothing happens, you are good to go. Just open the File menu and export an IFC file!
To create a usable IFC file, you will need additional steps like adding properties to the model. In a future article, I will detail more of the process.
Now you know how to get 3d models from Blender and convert them to BIM.
Modeling in Blender for architecture
If you are starting to use Blender for your projects and want to learn architectural modeling, you should consider looking at our modeling training:
- Course about architectural modeling with Blender
- Course about parametric modeling for architecture with Blender
You will also find the Blender basics for architecture, which is entirely free.


Thank you, very useful!
could not log on
Thanks for this tutorial.
It seems that last version of FreeCAD have ifcopenshell bundled, and also python is probably updated since your tuto: `print i` have to be write using `print(i)` (with spaces indentation just after the `for` by the way)
Hmm a little add to my last comment:
Using the “arch” workbench and going to Arch > utilities > IFC explorer, I got an error saying that ifcopenshell isn’t installed. So following instructions from http://ifcopenshell.org/python.html (by placing ifcopenshell into my python folder – instead of freecad one) and now it’s OK.
There is now an exporter for IFC out of Blender directly! It’s still relatively experimental and under heavy development but it does support a lot of features already:
https://github.com/IfcOpenShell/IfcOpenShell/blob/v0.6.0/src/ifcblenderexport/README.md
Hello,
have troubles exporting ifc from Blender. I get only a 4kB File.. need to select first? need to be organised in IFC formating.. when is it right? ifcproject/ifcsite/ifcbuilding/ifcbuildingstore/.. what else is needed?
where to find help? wiki?
Thanks
Lukas
Good Morning,
when importing ifc’s there are some discrepancies with other tools. But the Add-On is improving fast. And it works quite properly already. Still have my own troubles with the ‘select’ tool of Blender.
Lukas