Customize Consent Preferences

We use cookies to help you navigate efficiently and perform certain functions. You will find detailed information about all cookies under each consent category below.

The cookies that are categorized as "Necessary" are stored on your browser as they are essential for enabling the basic functionalities of the site. ... 

Always Active

Necessary cookies are required to enable the basic features of this site, such as providing secure log-in or adjusting your consent preferences. These cookies do not store any personally identifiable data.

No cookies to display.

Functional cookies help perform certain functionalities like sharing the content of the website on social media platforms, collecting feedback, and other third-party features.

No cookies to display.

Analytical cookies are used to understand how visitors interact with the website. These cookies help provide information on metrics such as the number of visitors, bounce rate, traffic source, etc.

No cookies to display.

Performance cookies are used to understand and analyze the key performance indexes of the website which helps in delivering a better user experience for the visitors.

No cookies to display.

Advertisement cookies are used to provide visitors with customized advertisements based on the pages you visited previously and to analyze the effectiveness of the ad campaigns.

No cookies to display.

Blender 4.2: Precise Modeling Workshop
Learning Resources →

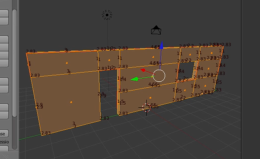
One of the projects from SoC 2011 is about UV Mapping in Blender, and the goal is to create an Automatic Seam creation tool. This would speedup the process of working with UV mapping in Blender, and since the project will also help a lot architectural visualization artists, I decided to give it a try. I went in graphicall.org and downloaded a build of the avocado branch. The project is still in development, but it is quite easy to use. Just create a 3d model, or pick anyone you have, and in edit mode find the Generate Seam button on the tool shelf. You will see the seams to be created automatically.

The video below shows the use of this feature on something with a topology that resembles a wall with a window and a door. How it ends? The UV is still messy and needs manual work, but is quite promising. When I try it with primitives like a cylinder or a cone, the result is much better.

To know more about the project, visit this page.

Blender 4.3 for Complete Beginners (Workshop)
Previous

How to chamfer edges with the Bevel Modifier for architecture

Next

Modeling for architecture with Blender Cycles

1 comment

Leave a Reply

This site uses Akismet to reduce spam. Learn how your comment data is processed.

Check Also

Clicky