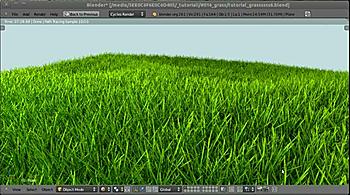
One of the most interesting tools added to Blender recently was the new render engine called Cycles. With this new and incredible addition to Blender, architectural visualization artists can work with options that were only available on external render engines like YafaRay, LuxRender and others. The Path Tracing integrator of Cycles gives us the possibility to create really nice renders for both internal and external scenes. If you are going to try Cycles to create external scenes for architecture, you may want to take a look on this really nice tutorial created by an artist called Igor Djordjevic.
How to create grass for architecture using Blender Cycles
In the tutorial he shows how to create a grass surface to use with Cycles. The grass is created using particles, and with some textures, we can get a nice grass surface. Below you will the tutorial in video, and here is a link to the tutorial on the artist blog.


Thank you Allan, this is exactly what I was looking for these days.
Cheers!
Yeay..Glad you’re back Allan, it’s been so long, thanks for the tuts anyway.
Regards
You can use different Grasspatch-Objects, group them and use “group” in the Particle-System to get more Colorvariation in the grass.
You also can define how many percent of each object in the group should be distributed by the Particle-System.
Here is my Grass-Setup:
http://www.archiviz.ch/download/Grasflaeche_02_051111.zip
Kind regards
Alain
Alain:
Thanks for sharing your grass setup. I tried it and only get solid color grass. It doesn’t seem to be using the UV mapped textures for some reason. I tried setting the texture coordinates to UV (it’s set as ‘Default’ when you open the scene) but still no luck. The grass just shows up as whatever solid color is set in the Glossy BDSF color setting.
I haven’t done much at all with Cycles yet, so my ability to debug its materials is limited. Any ideas what could be wrong?
@ D. Waschow
You have to “File->External Data->Unpack into Files”.
Kind regards
Alain