
How to use photometric lights with Blender 3D? Is it possible? Of course it is! When I have a project that requires the use of Photometric lights, I use Indigo as an external render for Blender. Just recently Indigo is supporting the use of IES lights, and it opened a whole new world of possibilities to light interior scenes, using real data from light manufactures.
Enough small talk, let`s take a look on how to use this type of lights with Indigo. If you want to follow this tutorial, you will need:
- Blender 2.46
- Indigo Renderer 1.0.9 (I know there are newer versions, but this is the newest stable version)
- Blendigo 1.0.9 (Script to control Indigo from Blender)
- Python 2.5
In this tutorial, I won`t explain how to install and setup Indigo and Blendigo. You can find all information get started in here, just go to the bottom of the page and download de BlenderIndigoTut.
Ok, with everything installed and working we can start to setup our scene to use a photometric light. Before we start, let me just explain how this type of light works. To use a photometric light as a light source for the scene, we have to add a unique material, to any object that will work as a place holder for the light. Actually, the object will work as an emitter.
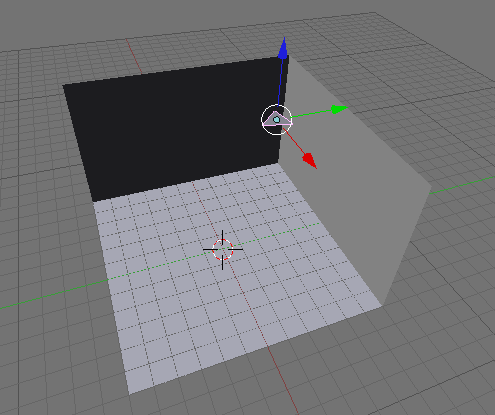
Here is our test scene, which consists of a very simple scenario.
At this scenario, we have a very small plane, which we will use as emitter. Add a material to this plane, and take note of his name. In my scene, this material is called “Material.001” and the material is only applied to the plane.
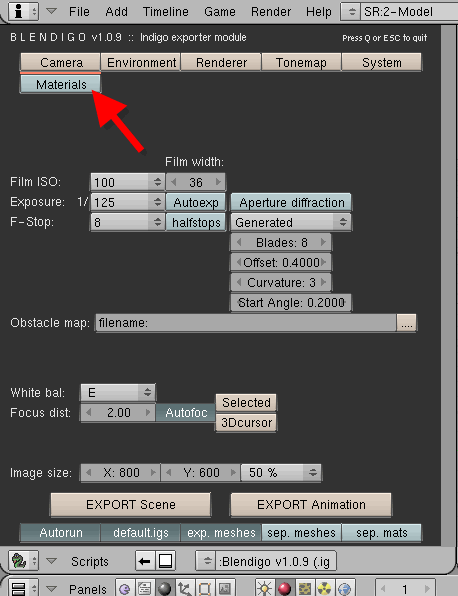
Now open the Blendigo interface, just split the Blender 3D view to create two windows and then go to the File -> Export -> Blendigo 1.0.9. It will open the Blendigo interface.
There you have to click on the Materials button, to edit the materials option.
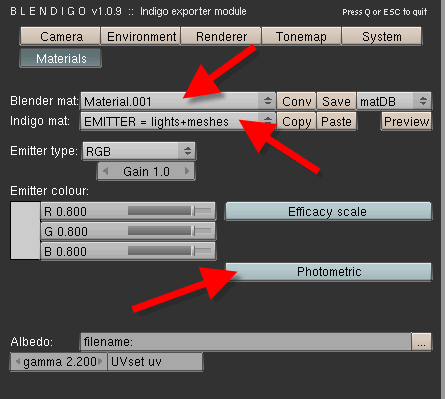
Choose Material.001 to edit the material applied to the plane, and then from the next combo box choose EMITTER = Lights +Meshes. It will make the material work as a light source.
And, to make the light emitted by the object to behave like a real light, click on the Photometric button.
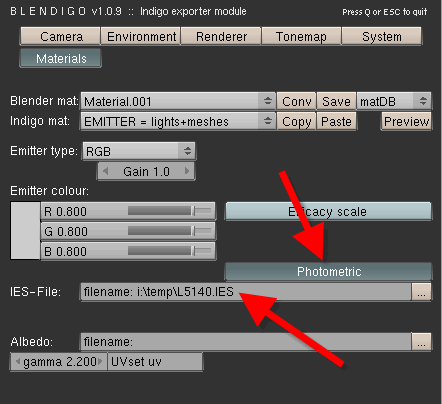
When we click there, an option to choose an IES file will appear. There we can choose a photometric file to setup the light. If you don`t have any IES files in your hard drive, you can find a lot of them for free here. When you install Indigo, it will place a few IES files at the installation folder as well.
When you decide, which IES file you will use, just point Blendigo to use this file.
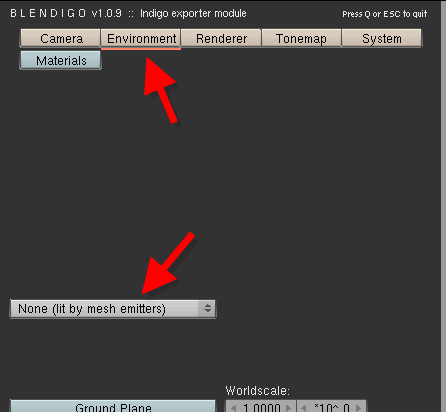
Now, we are almost finished. Go to the Environment area of Blendigo and choose “None (lit by emitters)”, to make the scene to be illuminated only by the IES light.
And that's it! Press the EXPORT Scene button and wait a few minutes to start seen some images. You will have to wait a bit longer to see a noise free image.
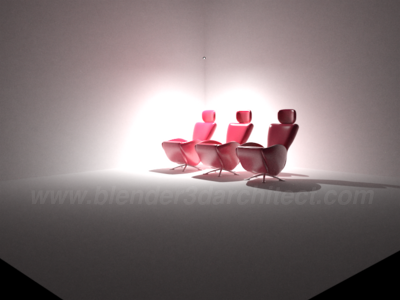
To make the image more interesting, I`ve putted a few chairs to the scene. Here is how it looks:
Now you know how to use photometric lights with Blender 3D! Here are a few final tips to work with IES lights:
- If you don`t want the plane to show up in the render, just decrease his scale to something near zero, like a value of “0.001” for all axis
- Some IES files don`t work with plane objects, if you get an error before the render starts, change the object type or the IES file
- We can control the direction of light with the face normal
Now it`s up to you!


Congratulations for the new blog & book. Im read the other periodically and is great too. Thanks for your time and effort in writing about this themes, archviz is my principal interest and with blender better.
Sorry for my english, hehe.
Saludos desde Mexico.
Hi,
Congratulations on nice blog and great book, which I will probably end up buying. Excellent iniative on ebook release by the way!
Shouldn’t “Using Blender 3D for Architectutal Visualization” be “Using Blender 3D for Architectural Visualization” instead. 🙂
Greetings from Finland
Thanks guys,
@bebraw: Oops! Thanks for warning me! 🙂
Regards from Brazil!
When you use an object instead of a plane, does it project light from all normals? So if we used a Japanese spherical lantern, would each polyface/normal be an emitter? Or do the object’s local axis become the “normal?”
Hi Asa,
Each plane of the object emitt light.
Thanks! Of course, right after I posted this question, I found your post about the gallery lighting where you actually mention that too. 🙂
Thanks for the helpful blog!
hi!
I’m an architecture digital lecturer and fans of blender from indonesia. I think you’re always show me a great news and info,and they are really helpful. could i have further discussion about using blender and yafaray for architectural visualization?i have few scenes and i’d like to get help in set them nicely,if you please.
thanks for your kind attention, and keep this blog cool!!