
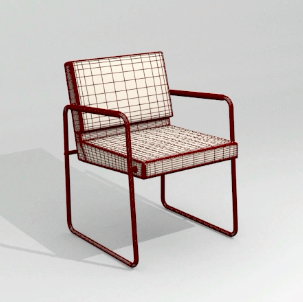
A wire render has a lot of uses in architectural visualization and most of them involve the demonstration of the structure of a 3d model for other artists. I ask all my students to produce a wire render of their 3d models to evaluate their work. In Blender we have to create a setup of two objects in order to create a wire Render, giving to one of the objects a material with the wire type selected, and adjust the wire with the Z Offset parameter. This works really well, but demands some work to setup all materials and to create the duplicates of the objects.
An add-on called Setup Wire Materials can speed up the process! The add-on was created by an artist called liero and is available to download at this thread in the Blenderartists forums.
The Add-on is quite simple to use, and for those of you that want a preview of how the add-on works, the video is a nice overview of the Add-on.
Rendering wires in Cycles
As a plus, the Add-on can create a duplicate of any 3d model, based on the wire structure. Why? The same workaround to render wires with the Blender internal render doesn’t work on Cycles. To be able to render wires in Cycles, an option called Create Wire Object of the add-on creates a polygonal copy of any object, using their edges to build a new object. This way we can see wire renders on Cycles. But, be aware that this process is really slow, and can demand some time, especially with dense meshes.


I’m opting for an OpenGL render in a Gimp layer set to Multiply on top of the actual render.
Very easy, very fast.
Furthermore, this also clearly shows the various types of edges used. Crease, Bevel Weights, Seams, Sharp, Face/Vertex Normals, if you want.
Just hit Display Properties (N) –> Display –> Only Render first to get rid of the grid floor and so on…
This is a pretty neat add-on, but I don’t think I’l use it..
This is my preferred way to create a wireframe render:
UV unwrap unless you’ve already done it (Smart UV project works fine for this, avoid overlapping UVs)
Export the UV as an png (Set fill to 0 opacity)
Set the image as a texture for the object (If you use BI, use the Ramp option to change the color of the wireframe)
This works perfectly for both BI and Cycles (Some might find it a little bit cumbersome, especially for Cycles). One drawback might be that you need all UVs on the same image or multiple materials if you want wireframe on more than one object.
This is the material setup I use for Cycles: http://screencast.com/t/q4nnst1m2T
I find it a bit tricky to get a nice result with the “double object way”, especially with more detailed objects. You get intersections etc.
Besides, using a texture gives you more options in Cycles that you can have fun with (glowing wires etc).
(If you want to simulate the wireframe material from BI, just set the second shader to be transparent)
/Chris
Hi Allan, great website and very useful tips. Slightly off-topic but can you please tell me the name of the music and artist you used for this video? (Add-on for wire renders with Blender internal and Cycles)
Thanks.
awsome addon! i have used this addon to render my bicycle model and i must say it adds that wow factor of detail to your models. thank you again really greatful 🙂